

we all want to love our coffee. at the very least, we want to enjoy it each and every day. every once in a while, we might even make our own cup at home that's simply amazing. unparalleled. can't be replicated.
well.. what if it can? what if amazing coffee is less about finding that "unicorn" cup, and more about.. consistency?
as you learn to handle these 8 core variables of coffee brewing, you'll learn to make masterful cups of coffee day after day.
when we talk about core variables, we have to consider one core reality: coffee is a crop. or, to be more clear, every coffee is different, and coffee is always changing. country to country, season to season, roaster to roaster, and even freshness off roast – coffee will vary.
as you develop your understanding of these core variables, you’ll learn to adapt to changes, hone in your favorite coffees, and brew a consistent cup day after day.
eight core variables
as you learn how these variables work together...
1. coffee quality: love your coffee
2. grind size: the most important factor behind the coffee itself
3. water quality: which water to choose, which water to avoid
4. time: the longer the brew, the greater the extraction
5. temperature: how a cold brew can take 24 hours while espresso takes 30 seconds
6. agitation & pressure: stirring can make.. or ruin.. your cup
7. filtration: the surprising effects of different types of filters
8. ratio: how much water to coffee, where to start
... you'll find yourself making consistent coffee day in and day out.
let’s break them down.
coffee quality
simply put: love your coffee. start with a coffee you know you like. as you learn these variables, you’ll learn to define why that coffee is your preference. often, as you learn & progress, you may begin to notice subtleties that can even shift your preferences & choices. that’s part of the fun!
here are a few tips & myths to help you use a discerning eye:
- expiration date ≠ roast date. a “roasted” date will tell you how fresh your coffee is (see below for more on freshness); with an expiration date, you’ll never know how old your coffee truly is. fun fact, coffee doesn’t expire for a very long time. it just stales.
- “mold-free” is already part of the process; don’t worry about the label. most, if not all, imported coffee is measured & dried to an exact moisture content before being shipped out of its country of origin; mold is minimal to none, particularly with specialty grade (this includes almost all local roasters) coffee. the remaining potential concern is extremely low grade coffee. some instant coffees or very cheap supermarket coffees may have lower drying & harvesting standards, or sit in dirty conditions before being roasted.
- oily coffee beans nearly always imply a very dark roast, never quality. while decaf or fermentation-processed coffees can often have some oils present, as a rule of thumb, oily (particularly when also dark in color) coffee is a direct result of charry, dark-roasted coffee. as the beans reach a temperature higher than other roasted coffees, oils are forced out of the bean onto the surface. if this is what you like, go for it! just know what you’re looking at.
- “notes” do not always equal “flavors.” “notes” on a coffee bag imply that someone down the line (likely the roaster) tasted this coffee and, relative to baseline “coffee” flavor, noticed subtle flavors in the cup. this is different from added flavors. “caramel mocha” drip coffee, or “highlander grog,” etc. imply added, artificial flavor in the cup. the former (notes) tends to highlight what the bean itself brings to the cup; the latter adds flavor to make coffee taste a certain way. we at ecc do not add any flavorings to our coffees; if you have a preference, make sure you check!
- roast level is just how long & hot the coffee was cooked. if you like it more charred & smoky, that’s a darker roast - it’s like a well done steak, and it has been cooked longer. if you like a lighter roast, you haven’t yet reached any charring, and you’ll likely taste more of that bean's subtle, natural flavors.
all of this is important, but once we’ve landed on our coffee, there are few things that can go very wrong, or very right. the first & most constant of these things is: water quality.
water quality
another significant & potentially overlooked category is the water you utilize to brew. while sometimes over-hyped, it’s true to say that without good water, you won’t brew good coffee.
while we won’t dive too far into the weeds, here are a few guiding principles:
- water must have minerals to extract coffee well; without them, your coffee may taste weak or undesirable. don’t use distilled water or reverse osmosis, unless minerals have been added back.
- even simple filtration can go a long way. some minerals in hard water can mute bright & delicious flavors; others can bring them out, or make the cup feel more full / intense (what we call body). some tap water is great, some is not.
run a couple of tests! compare your tap water with something as simple as a brita, then
try spring water to see if you notice a difference.
- pro tip: clean your brewer / kettle monthly. run 80% water, 20% vinegar through your brewer / kettle (brewing or bringing to a boil for 10 minutes) as you see scale begin to build up. sometimes a quick wash is all you need to bring your coffee back to life.
grind size
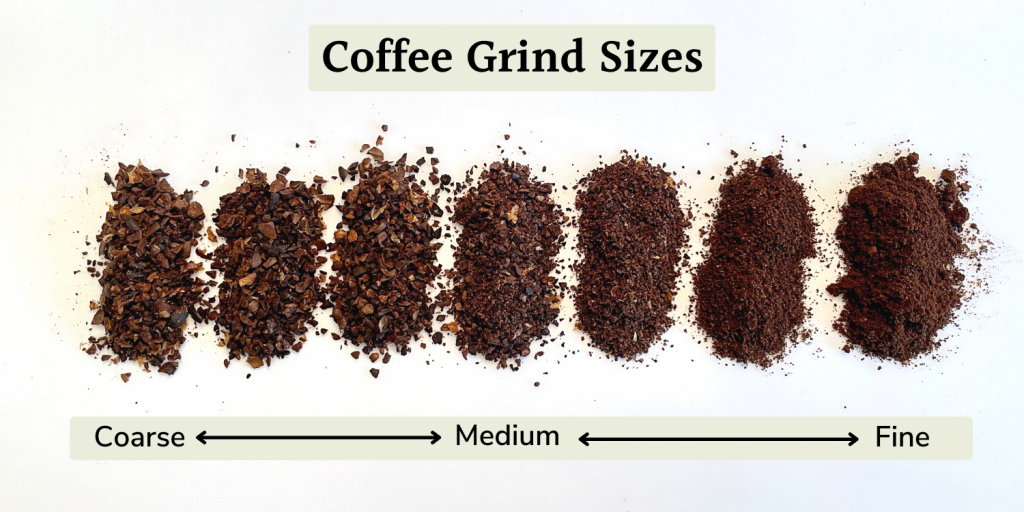
the grind size of your coffee (and, therefore, the grinder you use) will do more to affect the flavor of your cup than any other variable. in fact, in home espresso brewing, it is not uncommon for the grinder to cost more than the machine - you can’t brew high quality espresso without consistent, fine-tuned grinding.
here’s why grind size matters so much: coffee is like anything else that dissolves. the finer the powder, the easier things dissolve. the catch with coffee brewing is that you can over-dissolve it, or what we would call “over extraction.”
essentially, we’re trying to find a balance. if our grind size is too coarse (think rocks in a creek), water will flow around it too quickly, and the larger chunks will not extract enough: this is under-extraction.
if our grind size is too fine (think fine sand), water can’t flow fast enough. the fine pieces will sit with the water longer, and over-extract.
- under “time,” find a more detailed commentary on extraction and the resulting flavors -
this is where the recipes come in. once you learn your grind size, it’s primarily set-and-forget.
here are a few grind sizes associated with common brew methods:
drip coffee. grind size: medium fine (think fine beach sand, 3rd from the right)
french press. grind size: medium-coarse (think sea salt, 3rd or 4th from the left)
pour-over
~ chemex. grind size: medium-to-medium-coarse (slightly smaller than french press)
~ v60. grind size: medium-fine (think table salt, 3rd from right, slightly finer than drip)
espresso. grind size: very fine (slightly grittier than powder, far right)
cold brew. grind size: very coarse (think very coarse sea salt, 2nd or 3rd from left)
below, we talk about brew time. if you’d like to ensure your grind size is optimal for taste & flavor, partner the brew time suggestions below with your grind size (we’ll discuss how) to create peak quality, consistent coffee.
time
time, and the two following variables (temperature and agitation/pressure), are what we can lump into the category of “live variables.” that is to say, these are the three variables you’re thinking about during brewing; all other variables will, eventually, be dialed-in ahead of time. once again, set it and forget it.
on the other hand, these 3 variables are manipulated during the brewing process. thankfully, we don’t have to think about all 8 variables at once; these three are the three to consider once the brewing begins, and they work hand in hand.
to talk about these three, we need a quick side bar: extraction, the central action of all coffee brewing.
extraction: “the process of removing or obtaining something from somewhere” (cambridge).

indeed, all coffee brewing styles are varying forms of extracting the taste, flavor, and aroma out of roasted coffee.
in fact, only about 30% of the coffee bean can even dissolve with water; the remainder are plant fibers & non-soluble fragments that you’ll see stay behind in your filter).
here’s the catch: there’s a window. there’s an ideal point at which your coffee will taste its best. here’s the premise.
when i first begin pouring water over my coffee, all the natural salts & acidity begin to arrive on the scene. next, my sugars & sweetness begin to arrive (let’s call this minute 3 on my drip coffee brewer). finally, bitterness enters the scene right at the end.
if my coffee “under-extracts,” or doesn’t extract enough, it means i’ve stopped short of the window. i haven’t yet reached any bitterness and perhaps not even the sweetness. it may taste bright, sharp in my mouth, and underwhelming.
for my coffee to “over-extract,” it means i’ve pushed too far into bitterness. i essentially dissolved too much of this bean, and if i reach too far into the bitterness category, all the other flavors will disappear. bitterness covers all. i end up with a harsh cup of coffee.
enter: the window. it’s what we’ll call a “well-balanced cup.” the goal of most coffee recipes (and thankfully, recipes exist - we don’t have to think about all of the variables all the time!) is to land in an ideal window.
we want to reach the salts, reach the acidity, peak in sweetness, and touch the bitterness just before the cup finishes brewing. with all these components balanced, we’ll have a smooth, delicious cup of coffee. the bitterness brings that classic “coffee” flavor; the sweetness tames it to enjoyable. the acidity colors the palate with subtle delicious notes & flavors.
this is how extraction works.
two notes, then back to time.
1. lighter roasts & darker roasts extract differently. as a rule of thumb, you can expect darker roasts to reach the bitterness much quicker in the process. if it’s too dark, you may not be able to detect any sweetness or acidity at all, as the bitterness is the overwhelming component (essentially, during roasting, the sugars are already caramelized & perhaps even charred).
2. coffees vary. while this is a great rule of thumb, some coffees push boundaries and surprise us. try enjoying that. it’s part of the fun & excitement of brewing something we can’t fully control, but can certainly enjoy taming.
back to “time:”
brew time can now be simplified. here’s the whole premise:
the longer coffee sits with water, the more it extracts, and vice versa.
here are some common brew methods & the varying times they take to brew:
drip coffee. grind size: medium, time: 4-6 minutes
french press. grind size: medium-coarse, time: 4-8 minutes
pour-over
~ chemex. grind size: medium-coarse, time: 5-6 minutes
~ v60. grind size: medium-fine, time: 2.5-3.5 minutes
espresso. grind size: very fine, time: ~30s, varies
cold brew. grind size: very coarse, time: 16-24 hours (colder temps require more time)
you’ll notice that each of these has a varying & connected grind size; brew methods with coarser grinds take longer to extract, and brew methods with finer grinds take less time.
as you learn to connect these dots, you can adjust your grind size to match your brew time, and bring your coffee right where it needs to be. for example, if your drip coffee is taking 7 minutes, it is likely over-extracting. you may need to make your grind size coarser to allow water to flow quicker, bringing you to the ideal “balanced cup.”
above, i mentioned colder temperatures requiring more time with cold brew, specifically - at which point it's time to talk temperature.
once you understand extraction, understanding temperature becomes quite approachable.
temperature
something you can keep relatively constant during brewing, temperature plays a significant role in extraction.
the simple principle is this: heat dissolves and extracts. the hotter your water is, the quicker it will extract.
the general, modern rule of thumb is (with a few exceptions below) to always brew coffee with water between 195°f (90.5°c) and 205°f (96°c). anything less than this will not actually dissolve the coffee enough for adequate extraction, and anything more can risk burning your coffee, leading to more undesirable bitterness.
that said, here are a few exceptions & guidelines worth knowing:
roast level matters: light roasts can often handle the highest temps. very light roasts can even be brewed with water near or at boiling, whereas darker roasts tend to taste best with water on the lower end of the spectrum.
decaf is often uniquely brittle (just as dark roasts are), and some brewers have found that temps dipping near 180°f (82°c) can actually help preserve flavor while reducing bitterness. simply allow it to brew a little longer, perhaps with a finer grind, since the temperature is lower. decaf just can’t handle the heat.
cold brew is unique; the coffee doesn’t even technically dissolve as the water is not hot enough; the flavor & caffeine is essentially leached out, resulting in a unique cup. for a cold brew with a fuller body but less subtle flavor, brew at room temp for 18-20 hours. for a cold brew with a generally lighter body but more likely to bring out subtle flavors, brew for 24 hours at fridge temperature.
many drip brewers have no capacity to change temperature, with a strong portion of home drip brewers not even reaching 195°f. if you notice this on your brewer, you can try to accommodate by making your grind size finer, essentially making the brew time longer to make up for the lack of temperature. results will vary.
time: check. temperature: check.
our third and final “live variable” hits the scene: agitation & pressure.
agitation & pressure
working very similarly, we’re tying agitation & pressure into one. similar to the variable of temperature, agitation & pressure directly affect extraction. that is to say, if you either:
1) stir, swirl, pour aggressively, or in any way agitate your coffee, or
2) you apply pressure (espresso machine pressure, etc.)...
you will increase the extraction of your coffee. ta-da!
typically, once a coffee is brewing, agitation is minimal. the pouring of the water itself does most of the extraction. if you’re doing a pour-over, this matters more. you’ll want to find the balance of pouring too gently vs. pouring too hard.
additionally, some folks will stir their coffee early on in brewing, but if we stir too late in the process, we risk over-extraction & pulling out volatile flavors we don’t want. the simple principle here: be gentle with stirring.
pressure, on the other hand, is a bit unique. primarily something we think about with espresso, an inherently pressurized brew method, the simple principle is this: more pressure leads to more extraction. you can start involving pressure if you fill your pour-over too high, too quickly (the pressure increases as the water gets fuller and pushes down on the coffee more), but this is subtle & primarily just affects how fast your coffee drains or doesn’t. while that matters, other variables are far more likely to affect your coffee.
filtration
simply put, filtration is how you prevent yourself from drinking.. well, mud. we want to drink silky coffee, not mud. there are four primary styles of filtration, each with varying pros and cons: metal, settle, cloth, and paper.
let’s take a look at each:
metal: metal filters are reusable and easy, but do not filter as well as paper. while metal filters can be more practical, you may find your cup tasting more “silty,” and with holes bigger than those in paper filters, your coffee may also drain quicker in a pour-over. ideal for espresso and typically utilized for french press.
settle: a simple way to talk about how coffee was done for centuries. sometimes called “cowboy coffee,” instead of using a filter, you can simply allow your coffee & water to sit in the same container & brew together. eventually, the coffee grounds settle, and you just gently pour off the top. while no longer common, it can be a great & simple way to brew when camping or experimenting!
cloth: while both reusable and capable of straining finer than metal, cloth filters can be hard to clean & still lead to some grit in your cup. these can be ideal for cold brew coffee, as you can buy large cloth bags for large batches.
paper: our general go-to for most brew methods, paper is cheap, strains very well (all the way down to fats like cholesterol), and will leave a cup tasting very clean and clear. less environmentally friendly but relatively minimal, paper is ideal for drip coffee, pour-overs, and in some cases, french press and cold brew.
ratio (and recipe)
ratio is a combination of two variables: the amount of coffee, and the amount of water. this will depend on the brew method you use (see below), as well as, simply, your preference. if, say, you like a fuller-bodied experience, you may choose to brew your drip coffee with a “stronger” than standard ratio of coffee to water (and vice versa).
following are some common go-to ratios for varying brew methods:
the first number (the “1”) is the amount of coffee, and the second number (varying) is the amount of water to said coffee, typically measured in grams with a scale. as you’ll see, 1:16 (1 part coffee, 16 parts water) is a common starting point.

to find the amount of coffee you need from the amount of water you need, simply take how many ounces of water you're using & divide that number by the number in the ratio. for example, if it’s 1:16 & we’re making 32oz of water, take 32oz/16 to find that you’ll need 2oz of coffee.
honorable mention: bean freshness & storage
while this may theoretically fall under “coffee quality” or even be called its own variable, here are just a few quick freshness tips. if you’re interested in the why, read on:
aim to drink most coffee within 4-6 weeks of roasting for ideal freshness & maximum flavor
- beyond 6 weeks, most coffees stale & lose vibrant flavors, though some coffees may retain their quality for a few months
keep coffee whole bean until you are ready to brew, then grind fresh
- just as an apple will brown once bitten, coffee will oxidize and stale. preserving the whole bean until the time of brewing allows your coffee to last those 4-6 weeks
store airtight & in the dark to prevent staling
- air & light oxidize and degrade coffee. just keep your coffee in a dark, airtight container (or in a sealed container in a dark closet) and you’ll be in great shape!
and just like that, you’ve learned all the core variables of coffee brewing. let the games begin. go do this thing! make big mistakes. win big wins.
if i may, look up some recipes (that will help reduce your stress a whole lot – you don’t have to do all the work) and go from there!
you now know how to both improve your coffee and keep it consistent.